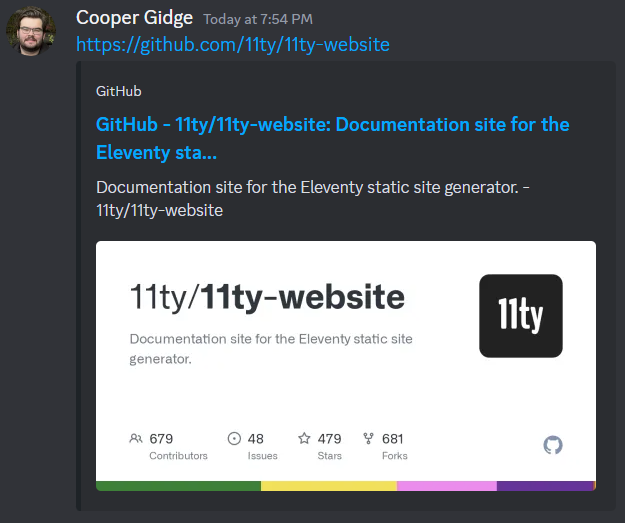
I recently set up automatic Open Graph images on this Eleventy site. Now, instead of making a custom OG image for every page on this site, I automatically generate them at build time.
This way, I can include data like the title and description in the image preview when my site is shared on social media. And these will automatically be updated if I ever change the title or description of the page.
GitHub actually does this and it looks super cool:

It is possible to do this on your Eleventy site thanks to the eleventy-plugin-og-image plugin!
This plugin allows you to generate OG images at build time using a HTML and CSS template. This means that once Eleventy generates your site's files, it will also generate an OG image for each page of your site using an HTML and CSS template that you make.
This way, you can design an HTML and CSS template, fill it with your page's metadata (like title and description), convert the template to an image, and use that as your page's OG image.
To start, we will install the plugin with npm using the command npm install eleventy-plugin-og-image --save-dev.
Now, we have to include this plugin in our Eleventy configuration file (usually .eleventy.js).
But first, we have to make sure our module.exports function is async. This is required for the plugin.
module.exports = async function(eleventyConfig) {
	// Configure Eleventy...
};
Now, let's add the plugin:
module.exports = async function(eleventyConfig) {
    // Make sure `EleventyPluginOgImage` is inside `module.exports`
	const EleventyPluginOgImage = (await import('eleventy-plugin-og-image')).default;
    // You will also need the Node.js `fs` library
    const fs = (await import('fs')).default;

    eleventyConfig.addPlugin(EleventyPluginOgImage, {
        satoriOptions: {
        fonts: [
            {
                name: 'FontName',
                data: fs.readFileSync('./_src/assets/fonts/font.woff'),
                weight: 400,
                style: 'normal',
            },
        ],
    });

    // Configure Eleventy...
};
And now the plugin is installed!
Including a .woff font file is a must. Notice how in the last step, I included a font.woff file. You can replace this with the path to the font you want to use.
Remember: ./ refers to the current directory, and ../ refers to the parent directory. Since your Eleventy configuration file will probably already be in the root directory, you probably have to start your file path with ./.
You can also specify multiple fonts like this:
module.exports = async function(eleventyConfig) {
    // Make sure `EleventyPluginOgImage` is inside `module.exports`
	const EleventyPluginOgImage = (await import('eleventy-plugin-og-image')).default;
    // You will also need the Node.js `fs` library
    const fs = (await import('fs')).default;

    eleventyConfig.addPlugin(EleventyPluginOgImage, {
        satoriOptions: {
        fonts: [
            {
                name: 'FontRegular',
                data: fs.readFileSync('./_src/assets/fonts/fontRegular.woff'),
                weight: 400,
                style: 'normal',
            },
            {
                name: 'FontBold',
                data: fs.readFileSync('./_src/assets/fonts/fontBold.woff'),
                weight: 700,
                style: 'bold',
            },
        ],
    });

    // Configure Eleventy...
};
Note that bold versions of fonts will need to be included here. Using font-weight: bold; won't work!
Now, we have to create a template using HTML and CSS. Let's make a file called og-image.og.njk in our Eleventy project and fill it with the following:
<style>
    .root {
        width: 100%;
        height: 100%;
        display: flex;
        flex-direction: column;
        align-items: center;
        gap: 20px;
        background: #FFFFFF;
    }

    .title {
        color: #000000;
        font-size: 80px;
        font-family: "FontBold";
    }

    .desc {
        color: #000000;
        font-size: 40px;
        font-family: "FontRegular";
    }
</style>

<div class="root">
    <h1 class="title">{{ title }}</h1>
    <p class="desc">{{ desc }}</p>
</div>
Note that this plugin has a bunch of rules about what you can and can do. For example: all div elements need to have a display of flex or none. Not all elements or properties will work, but there's enough to do what you probably need to do.
If you want to use images in your template, you're going to have to convert to base 64. I promise this is easier than it sounds.
Instead of adding an image to your template like this:
<img src="/path/to/image.png">You're going to have to convert the image to base 64 and include that:
<img src="data:image/jpeg;base64,/9j/4AAQSkZJRgABAQEAYABgAAD/4QBoRXhp...">If you just need to use a single image, you can use an online tool to do this conversion for you. Then add the following to your image's src attribute, replacing {extension} and {base64Image} with your image file extension and base 64 code respectively.
data:image/{extension};base64,{base64Image}
If you need to include more images, you can check out this nice shortcode that automatically does this conversion for you.
To generate the image and include it inside your page's <head>, we can use the {% ogImage %} shortcode, which comes with the plugin.
<head>
    {% ogImage "./og-image.og.njk", { title: "Hello, World!", desc: "Welcome to my site." } %}
</head>
This shortcode takes two parameters: the path for your og-image.og.njk file relative to the Eleventy input directory, and the data you want to fill your template with.
You can manually specify this data, or use whatever data you've set.
For example, if you do this:
<head>
    {% ogImage "./og-image.og.njk", { title: title, desc: desc } %}
</head>
Then if you set title and desc in your page's frontmatter, those values will be used.
---
title: "Hello, World!"
desc: "Welcome to my site."
---

Your page content here...
The {% ogImage %} shortcode will generate an OG meta tag with a link to your image like so:
<meta property="og:image" content="/og-images/f7f85d4f.png">Note that this link will change whenever you generate your site again.
Want to see and preview your image when developing using localhost? Head on over to http://localhost:8080/og-images/preview/your/page/url.png. This will only be generated in development and won't be generated in production.
So, if you have a page at /posts/post-title/, you can head to http://localhost:8080/og-images/preview/posts/post-title.png to preview the image.
There you go! If all went well, you should now have an automatic OG image for every page with the {% ogImage %} shortcode. This shortcode will also automatically include the <meta property="og:image"> tag, using a randomly generated link for your images.
Cheers to the obligatory I-did-a-thing-so-here's-how-I-did-it post!
